
Note: The following is an excruciatingly detailed account of my attempt to repair a piece of broken furniture. If you prefer the TL:DR version, I don’t blame you in the least, and here it is: I did it, and no one got hurt.

The Wall Street Journal‘s reviewer of Stewart Brand’s Maintenance: Of Everything, Part One notes that “constant upkeep and repair can be a kind of life-affirming ritual — an appreciation for how even the best-made machines require the regular intercession of human skill and diligence.” That resonated with me because I had just completed a repair that allowed us to continue using a somewhat expensive piece of outdoor furniture, and while it didn’t exactly affirm my life — I may be shallow, but not that much — nor did it involve a signficant amount of human skill, I admit to basking in a bit of a glow.
Over the past eight or nine years, we’ve amassed a collection of Breezesta patio furniture, including gliders, tables, and bar-height chairs. The furniture is made of recycled plastic, HDPE — High Density Polyethylene — to be specific. The pieces are well-constructed (mortise and tenon joints; quality fasteners), quite durable, heavier than you would expect (47 pounds for the single seat gliders, according to the brochure), and have a grain that could pass for actual wood. The furniture was pretty expensive — the gliders were about $250 each — and came with a “lifetime pro-rated” warranty against cracking, splintering, chipping, peeling, rotting, structural damage, and insect infestation.

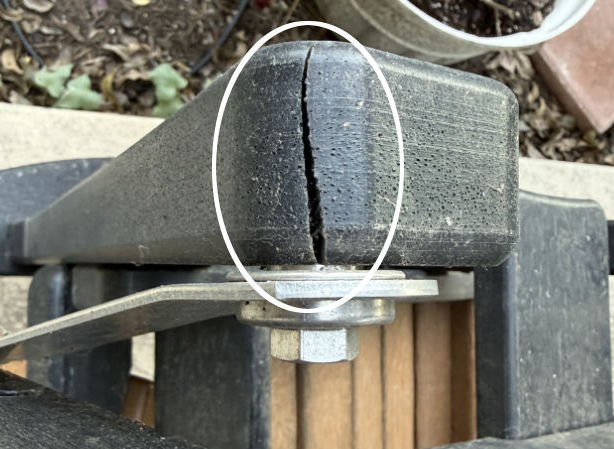
We first noticed problems in one of the gliders about a week ago; it didn’t glide as much as it clanked. A close inspection revealed cracks at the ends of all four legs, near the fasteners, and one leg had snapped in two, causing the glider to cease gliding. I remembered that the warranty was supposed to cover these conditions so I went to the company’s website to see how to file a claim. I hoped to get replacement parts for the damaged components.
Here’s an example of the cracks at the base of the glider’s legs:
Imagine my surprise when I saw the notice that the company that manufactured and sold the furniture under the Breezesta name, Casual Living Unlimited, LLC (“CLU”), had ceased operations in April of this year. Unfortunately, there was no warranty against the company going out of business. And I suspect that it went out of business due to its warranty, because several of those conditions mentioned above are now evident in some of our furniture.
Meridian Management Partners (“MMP”), a management consulting firm, has been engaged to administer warranty claims and deal with CLU’s creditors. MMP has created an easy-to-use online process for submitting warranty claims, said process comprised of a warranty claim form and a helpful list of warranty claim FAQs.
I hoped that a successful warranty claim would result in our receiving replacement parts, but that hope was quickly dashed by this statement in the FAQ: There are no parts or furniture available for purchase or warranty replacement. Plan B was hoping to get a financial settlement, but it’s a safe bet that we’re last in line for any such settlement. Regardless, a cents-on-the-dollar settlement wouldn’t solve the problem of having a defective chair. I submitted a claim anyway, including photos of all the damaged, defective components. Sadly, I couldn’t locate a receipt for the purchase of the gliders, a rather unusual situation given my accountant’s propensity to save paperwork until it disintegrates into dust. I knew the year we purchased the furniture (2018) and trusted that would satisfy the warranty elves.
[Update (12/12/25): I was notified today by MMP that our claim will be denied for lack of a receipt. I’m not surprised, nor disappointed given the success of “Plan C,” described below.]
But what we really needed was Plan C: a repair of the furniture so that we could continue to safely enjoy it. I didn’t want to wait on the warranty process to play out; I assembled my repair team:
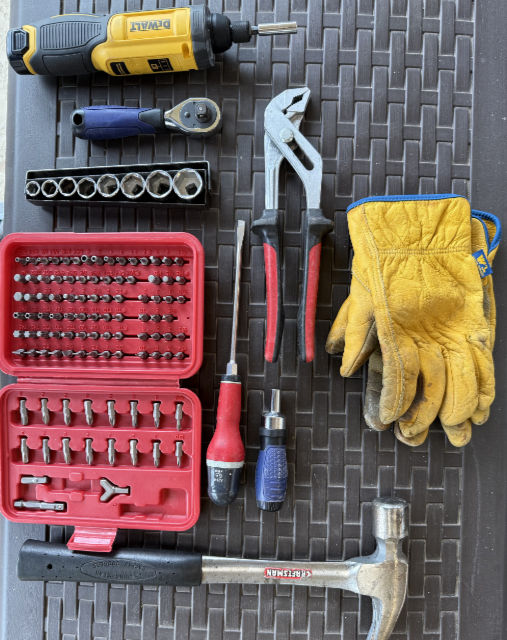
Thankfully, the furniture was constructed in a fashion that would have made Henry Ford proud: there are only three types of fasteners — about a hundred tiny Torx screws, all the same size, four half-inch bolts that hold the glider mechanism in place, and eight or ten Phillips head lag screws, all identical in length.
The first step was to disassemble the chair. I would have normally been more cautious about this process [1] but in this case I had a second identical and fully assembled chair to refer to in case I needed a template on how to reassemble what I took apart. And, of course, that did me little good, as you’ll later see.
I entered this phase with the thought that I might be able to craft a replacement piece out of lumber…but once I saw the mortise and tenon joints, along with some non-standard angles and beveled edges, I knew that I was way out of my depth for that project. I had neither the tools nor the skill to replicate those pieces. So, repair was the only realistic alternative.
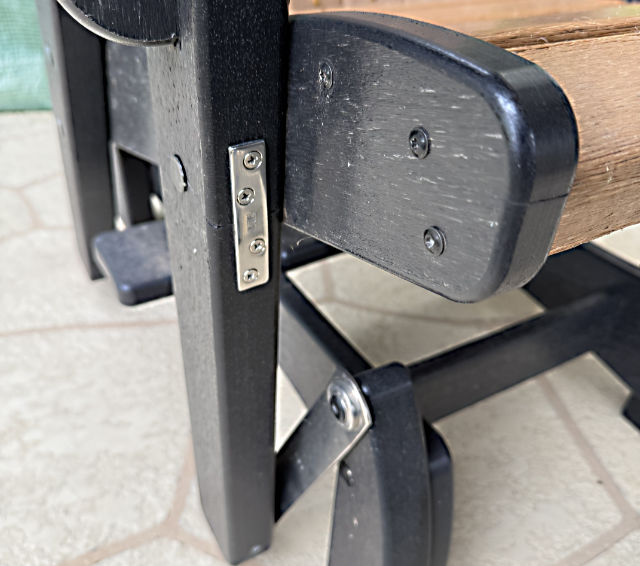
The first and easiest repair was to the broken leg. After clamping the two pieces in a bench vise, I joined them using two flat metal repair plates, acquired via a quick trip to the local Ace Hardware store, one on each side of the leg. You can see the finished product here:
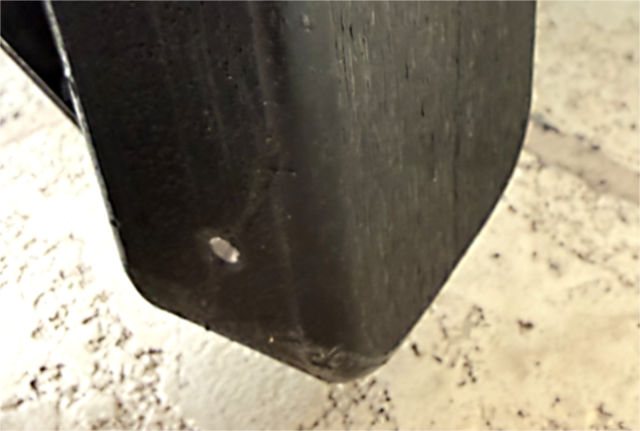
The next repairs were to the cracks in the bases of the legs (refer to the photo above for a reminder). These repairs were made using a long deck screw in each after clamping the cracks closed in the vise. The following photo shows one of the repaired legs; the silver dot is actually the pointy end of the screw which was longer than the leg was wide. I used a hacksaw to cut it flush, then used a file to take off any rough edges. Note that what appears to be a faint vertical crack is actually just a cosmetic surface marking.
I repeated this repair for the remaining three legs and then reassembled the chair. The two back legs went on without a hitch, and I thought the front two did as well until I attempted to connect the metal hangers and realized that I had installed them backwards…even though I had compared them to the other assembled chair. *sigh*
Fortunately, it was relatively simple to remove those legs, turn them around, and reconnect them properly. I also took some extra time and tightened the remaining multitude of Torx screws that weren’t involved in the original repair, just to ensure that the glider components were as tight as they needed to be.
I confess to being proud of the final result. The repairs are almost unnoticeable even without a bit of spray paint to conceal them. Debbie tried out the glider and pronounced it even better than the other one (meaning that I probably need to inspect that one and see what needs to be tightened, if not actually repaired).
I’m far from being an expert DIYer. The Gazette’s Tools & DIY category is liberally sprinkled with documented cases of “adventures” where my attempts at construction and/or repair yielded less-than-optimum results. Still, I believe I’ve had [slightly] more wins than losses, and the occasional failure makes the win that much more fulfilling.
Footnote of little edification:
[1] This is, of course, a gross exaggeration. You’re no doubt familiar with the phrase “fools rush in where angels fear to tread.” Welp, if you edit that slightly to read “fools disassemble stuff where intelligent people know better,” then that phrase applies to my every attempt at repairs. I can’t help it; taking things apart is my gift. Putting them back together? Not so much. [Return]
Discover more from The Fire Ant Gazette
Subscribe to get the latest posts sent to your email.
I’m impressed!! Wally wants me to tell you this. We still have our house in Levelland. I decided I needed a vanity desk. Said some assembly required. Came in a box!! 9 drawer complete with lighted mirror (Hollywood style). Took him 10 hours plus and almost a marriage. But I now have a vanity!!
Good for Wally! (Did he expand his vocabulary during the project? 🤣) The three most feared words in the English language are “some assembly required.” It’s especially bad when the instructions are just a series of drawings with no explanation whatsoever.
Neither Nick Saban nor Dr. Phil, but one for the “win” column, and likely therapeutic nonetheless.
Gotta take wins where you find them, no matter how obscure. 😄