
A few weeks ago, we and another couple spent a few days in Santa Fe at a very cool B&B a few blocks away from the downtown plaza. The B&B was a remodel with nicely updated interior features, including soft-closing bathroom and kitchen drawers.
Our almost-20-year-old home in Horseshoe Bay has nice custom cabinetry, but the drawers do not have the soft close feature. Our stay in Santa Fe got us to thinking about how feasible it would be to add that to our existing drawers.
As it turns out, it’s a pretty straightforward process, and by “straightforward” I mean “it will take all the tools, time, and swear words in your possession to accomplish.” But, it is possible.
A quick search turned up these highly-rated soft close adapters, and I ordered ten of them to test the concept – and my ability to install them (to be honest, probably more the latter than the former).
I immediately ran into a problem challenge. Most of our cabinets are what are referred to as “face frame,” meaning that the rails that the drawers glide along are not mounted flush against the cabinet wall; there’s a gap between the cabinet wall and the rail, and this can change the way the soft close adapter is mounted. The adapter is mounted via two screws, one at each end. The adapter sits on top of the drawer rail and the front is screwed into the cabinet frame, flush with the drawer rail. But the back end will “float” since it’s not flush against the cabinet wall.
The adapter installation instructions say that you don’t have to affix the rear of the adapter…but I’m not sure how that might affect the stability or longevity of the mechanism, especially for heavier drawers. So, I took the alternate route of creating a spacer that first attaches to the cabinet wall, and then the rear part of the adapter is fastened to it.
I don’t know if this makes for a better installation, but I do know it increased the installation time and effort by a factor of ten. About half of the steps shown below can be eliminated if you decide to attach only the front part of the adapter.
If you read some of the reviews for these adapters, you might run across some people who were able to use a standard size of board, such as a 1″x4″, as a shim for all the adapters. This is a great idea IF your cabinets are all of uniform dimensions. Ours, of course, are not. The drawer rails are mounted with gaps varying in width from 1/2″ to almost 2″, and often the left gap is different from the right gap on the same drawer. (Fortunately, for most drawers, only one adapter is needed.) As a result, I had to create each individual spacer from scratch. Here’s how I did it, and how the adapters were then installed.
Step 1 – Measure for the spacer
I went to Home Depot and bought an eight foot length of 2″x2″ furring strip. The 2″x2″ area is sufficient to permit both the mounting of the spacer against the cabinet wall, and the mounting of the adapter to the spacer. To determine the required spacer width, I simply placed a length of the furring strip flush against the cabinet wall and marked it along the line where the drawer glide rail is affixed.
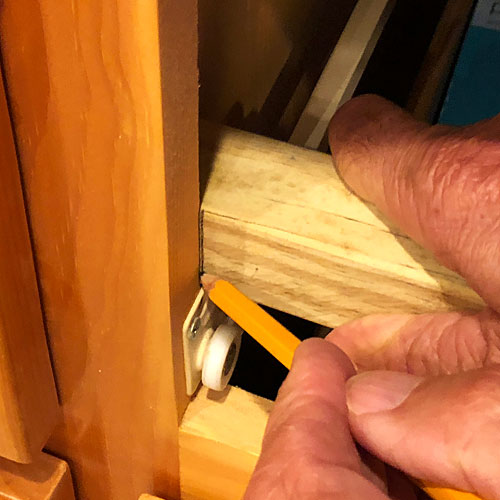
Marking the width of the rear spacer
Step 2: Cut the spacer
I used a miter saw to cut the spacer along the marked line. The lettering on the spacer indicates on which side of which drawer it will be mounted.
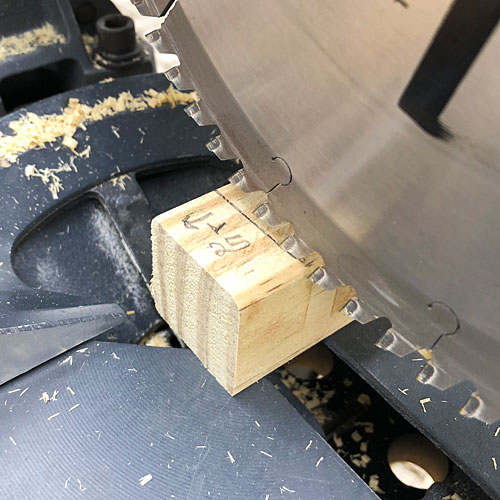
Cutting the spacer; the numbering helps keep track of which drawer it belongs to.
Step 3:Drill a mounting hole
After cutting the spacer, I drilled a mounting hole using a countersink bit. It’s not essential to countersink the mounting screw; I just like the cleanness of a flush screw. However, if you need a little extra screw length, the countersink might provide it. But in any event, since a furring strip is probably not the best quality wood, drilling a pilot hole will prevent splitting when you mount it.
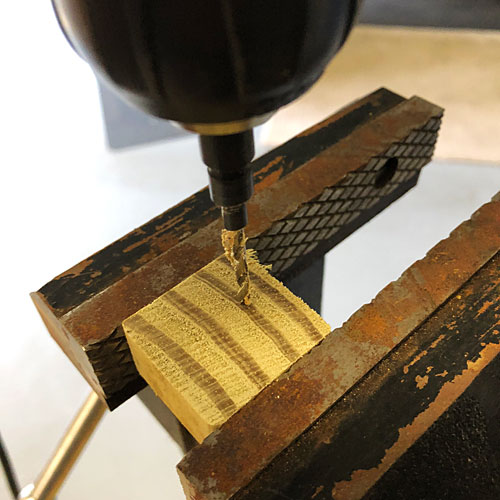
Drilling a hole with a countersink bit
Below is the drilled spacer with the wood screw that will be used to mount it to the cabinet wall.
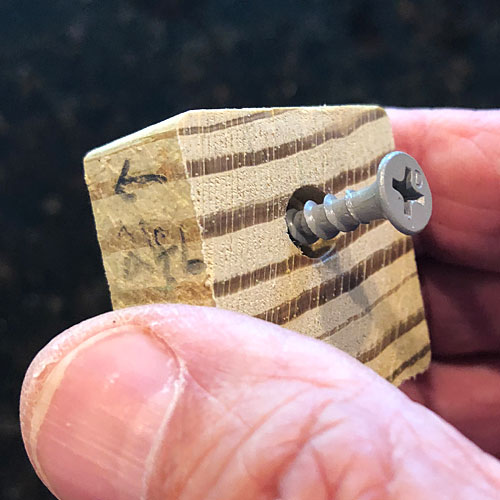
Rear spacer with mounting wood screw
Step 4: Mount the soft close adapter (front)
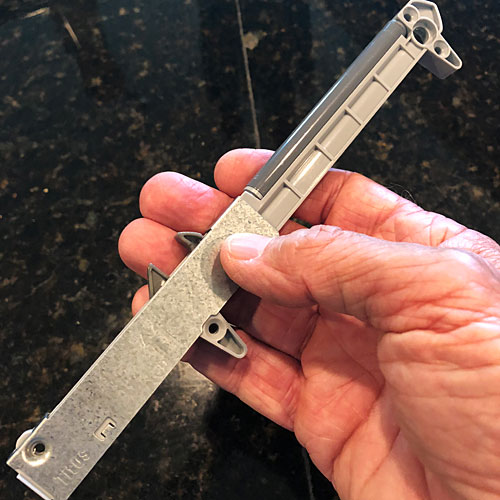
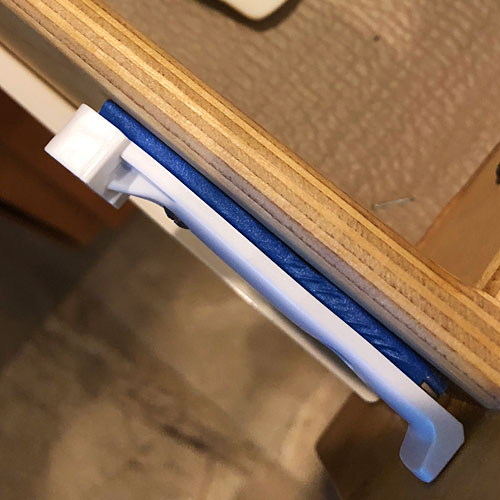
Below is the adapter that mounts to the cabinet wall. The metal end (shown in the lower left corner of the photo) is the front of the adapter. The two “legs” on the bottom of the adapter sit on top of the drawer rail (see next photo, below).
The soft close mechanism is pretty ingenious. The two gray tabs on top of the adapter are spring loaded. When fully installed, an “actuator” mounted on the side of the drawer pulls the tabs to the front of the adapter and the front tab folds down flush with the adapter body. The action of pulling those tabs back pneumatically loads the small gray tube along the back of the adapter. When the drawer is closed, the actuator engages the rear tab, pushing it back, and the front tab pops back into place. Together, they hold the drawer while the pneumatic tube pulls the drawer shut.
There is a bit of resistance when opening the drawer, as the actuator pulls the adapter tabs back. Some people take issue with this, but it’s not enough to cause a problem. It’s also possible to lift the drawer off of the tabs when opening it, thereby defeating the soft close action. But as long as the drawer is pulled straight back, this won’t (shouldn’t?) happen.
The soft close adapter
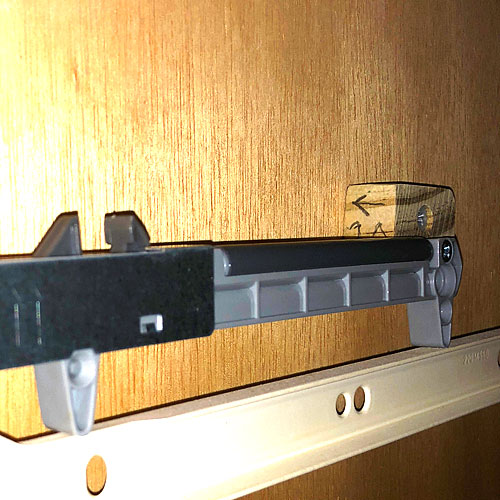
It’s hard to discern in this photo, but the rear of the adapter is about a half inch away from the cabinet wall. A spacer placed behind it will address this issue.
The adapter is in place for permanent mounting. Note the tab that allows precise spacing from the front of the cabinet.
Step 5: Mount the spacer
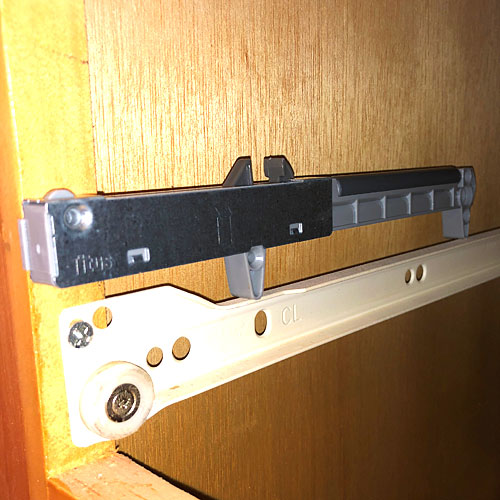
The photo below shows the spacer screwed into the cabinet wall, and the rear of the adapter screwed into the spacer. If the rear leg of the adapter is flush with the top of the drawer rail, you’ve [probably] got it mounted just right. (An exception is discussed below.)
Depending on the width of your drawer, mounting the spacer can be a chore best suited for a professional contortionist. I can’t recommend this DeWalt cordless gyroscopic screwdriver strongly enough; it’s like having a third hand, and it’s probably the tool I reach for most often.
The adapter has been screwed into place. The spacer was attached to the cabinet wall, then the adapter was affixed to the spacer by a second wood screw.
Step 6: Mount the actuator
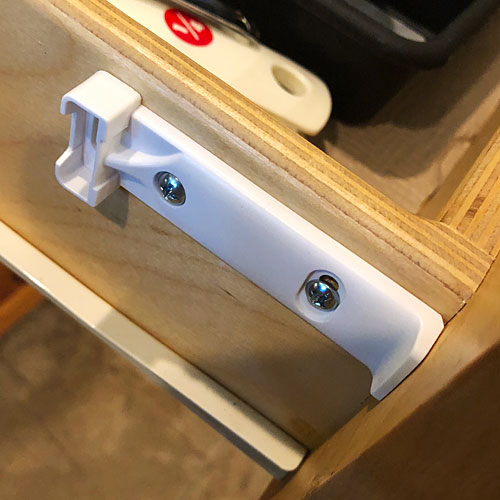
A plastic actuator will be mounted flush with the face of the cabinet, and positioned so that the rear of the actuator (shown below) sits just on top of a plastic “bump” on the adapter. It’s really important to get this mounting position right. If the actuator is too high, it won’t engage the adapter; if it’s too low, the drawer will jump noticeably when opening or closing it.

The actuator is positioned on the drawer so that it just touches the “bump” on the front end of the adapter.
The instructions that come with the adapter suggest removing the drawer and placing it on its side to install the actuator. I did that for the first few drawers, but then I realized I could mount the actuator without removing the drawer (and thereby avoid having to empty and refill it). I found that marking the position of the mounting holes with a pencil, then using a spring-loaded center punch to ensure that the screws didn’t “walk” made the actuator installation a breeze. (As an aside, if you don’t have a spring-loaded center punch, I highly recommend getting one. It is, as my father-in-law used to say, handy as a pocket on a shirt.)
The actuator screwed into place on the drawer.
I mentioned above that if you mounted the adapter properly, the soft close function would work as advertised. I found that wasn’t necessarily the case, as on one drawer I had to put a shim behind the actuator to make it engage the adapter (yay for custom cabinetry). This proved pretty simple, as we happened to have some popsicle sticks that seemed to have been designed with shim capability in mind.
For this installation, I had to shim the actuator with a couple of popsicle sticks so that it would engage the adapter.
Not every drawer in our kitchen required a rear spacer. The bigger lower drawers, where we store our pots and pans, are frameless, meaning that they have the glide rails mounted flush with the cabinet walls, so that the adapter can be mounted without a spacer.
Also, most of our drawers required only one adapter. If you have a particularly big or heavy drawer, you can mount adapters on both sides, but even some of our drawers that I predicated would need two are working just fine with one. Try using just one first; you can always add the second one later as needed.
While this whole process was fairly tedious and time-consuming, we’re quite happy with the result. The adapters really do work as advertised.
If the installation goes as planned, here’s how the drawer will close.
Discover more from The Fire Ant Gazette
Subscribe to get the latest posts sent to your email.
I must say I’m very impressed. So much easy and less expensive than replacing the drawer guides with manufactured soft return. I’m still having to make adjustment on one or two. GOOD JOB!!!!
Thanks, Gene. I went into this project thinking that I’d have to replace the rails, not knowing that these adapters were available. That seemed like a very daunting approach, and your feedback confirms that. The adapters are not as elegant, and may not be as long-lasting, but they were certainly easier!
On the other hand, we have at least one drawer where the original installation was not done well, so the drawer sticks a bit, and the adapters can’t overcome it. For that one, replacing the guides may be the only solution.
Eric – I didn’t see any mention of the need to be a human contortionist to stick your head and upper torso into the dark recesses of the cabinet. Retrofitting anything into existing cabinets is not for the squeamish. Makes one understand clearly why building them square and installing all hardware before actually installing cabinets is HIGHLY recommended 😬😳👍