
I’ve hired teenagers to mow our lawn for the past two summers, and one of the challenges in those arrangements was remembering to leave a gate unlocked so they could access the back yard. Because of travel plans and other scheduling uncertainties, that sometimes meant leaving the gate unlocked for days at a time.
Our gate locks are keyed deadbolts and that means that we also have to grab a key to get into the back yard, and that’s inconvenient. What we needed is a digital gate lock that would eliminate the need to loan out a key to third parties, or carry a key ourselves, or leave the gate unlocked.
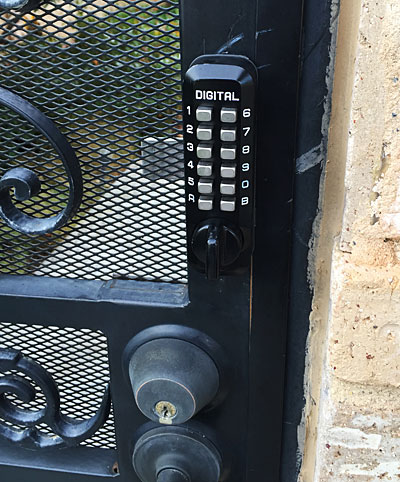
I found a solution to these problems in the Lockey M-220 digital lock. This is a basic deadbolt lock that’s designed to work in a variety of outdoor situations where you need some basic minimum security: pool gates, workshops, yard gates, etc. It’s mechanical, not electronic, and thus there are no batteries to change. It’s a rather inexpensive lock and is easy to install. At least, that’s what the website led me to believe.
I ordered the lock via the above-linked website and when it arrived and I read the installation instructions, I got a familiar sinking feeling of being over my head, mechanically speaking.
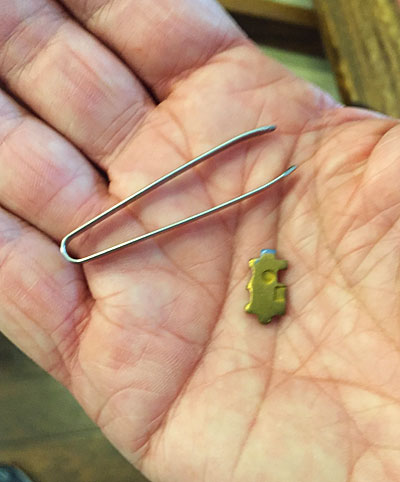
First, there was a dizzying array of screws, bolts, spacers, rods, and tiny metal bits that looked like jigsaw puzzle pieces. There was also the troubling presence of a set of tweezers.
Then, there was the instructions. What can I say about those instructions? You know there have been clinical studies about the stress that IKEA’s infamous DIY assemblies can cause. Well, if you’re comfortable putting together an IKEA home nuclear reactor (aka Facinmelton) by looking at the instructions upside down in a broken mirror, you’ll do just fine with the lock installation.
The installation instructions were complicated enough without later discovering that some of them were actually for a different model of lock, and it didn’t help that those steps were flagged with “IMPORTANT: DO THIS OR RISK RUINING THE LOCK!” and the “THIS” referred to a part that didn’t exist on my particular model.
And, as if the installation instructions weren’t obtuse enough, the process for changing the lock combination was more complicated than a NASA moon mission launch sequence. Plus, it involved tweezers.
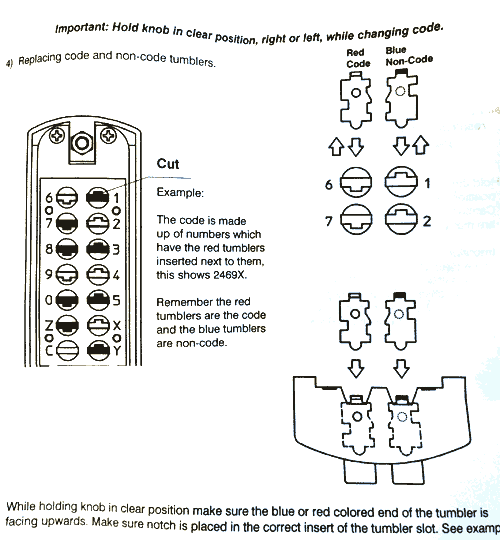
By the way, in those instructions it is never explained exactly what the “clear position” is, although failure to maintain it will bring an end to life in the universe as we know it. As it turns out, the clear position is the natural state of the lock; if you don’t fool with the deadbolt while changing the combo, you’ll be fine. So now you know, and the universe is safe.
Despite these challenges, and my total cluelessness, I embarked on the installation. And the first thing I discovered was that, because my life is nasty, brutish, and short, the lock was designed for a door that opens in the exact opposite direction of mine. Fortunately, the manufacturer anticipated this situation and provided some not-entirely-cryptic instructions for swapping the opening direction mechanism (there’s a more technical term for that but I’m so over it).
The actual installation went fairly smoothly, meaning that by the end of the process, I had only slightly less than half of my tool collection gathered around the gate, even though the instructions assured me that I could do it with only a screwdriver. And tweezers.
Because of the construction of our metal gate, I had to do some trimming of the spacers and shims (is that redundant?) so that the main body rested flush against the gate. I also couldn’t put the lock quite as close to the edge of the gate as I would like, meaning that the deadbolt didn’t engage the, uh, engagement slot quite as much as I would like. But, again, this is not a maximum security installation and in the end, I was quite satisfied with the outcome.
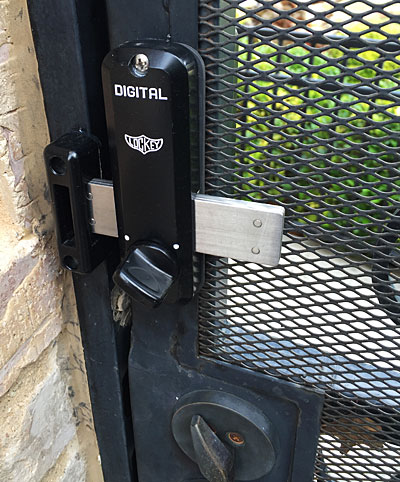
The lock is NOT in the clear position.
Despite all my complaints and grumblings, I actually do recommend this lock for certain outdoor applications that don’t require maximum security. There are other variations that have keypads on both sides, and that also have the more standard indoor deadbolts, and the lock comes in a variety of finishes.
There are two downsides to note, however. Changing the combination requires completely uninstalling the lock in order to get to the innards. (It also requires tweezers. Have I mentioned the tweezers?) This is a major pain, and I don’t plan on doing it anytime soon.
Second, because of the mechanical nature of the locking mechanism, the unlock code is very simplistic. Even though it can be multiple digits, the order of the digits isn’t important. So, an unlock code of 2143 is also 4321 and 1234 and so on. Again, this might be a big deal if it was on the front door of your home, but it’s not for my installation.
An extra minor consideration if you want to install the lock on a metal gate as I did: the kit comes only with wood screws. Plan accordingly.
If you end up buying and installing one of these locks, I’d be interested to know if you invent any new vocabulary to go along with it. Drop me a line and let me know.
Discover more from The Fire Ant Gazette
Subscribe to get the latest posts sent to your email.